


Are you looking for a unique and creative way to make your own custom carving knife? With just some basic tools, a Sawzall blade, and a bit of know-how, you can transform the ordinary into the extraordinary and craft yourself an exquisite knife that is perfect for sculpting wooden carvings. Making your own knife is a DIY project that anyone can do with the right guidance — why not take a chance and see what you can create with this DIY knife-making technique?
How to Make a Carving Knife From a Sawzall Blade?
Staying Sharp

To embark on this woodworking adventure, start by gathering the necessary supplies: a sturdy sawzall blade, a pair of vice grips or clamps for securing the blade, a reliable hacksaw blade for cutting and shaping, a file or sander to refine the edges, and a drill bit to create any desired perforations or embellishments.
With these tools in hand, you’ll have everything you need to transform a simple sawzall blade into a one-of-a-kind carving knife. Let your creativity soar as you shape and refine the blade, crafting a tool that is not only functional but also a work of art.
Raw Materials
The raw material that you choose for your carving knife will ultimately determine the performance and aesthetic of the finished product. You’ll want to select a sawzall blade that is made from a high-quality steel alloy, as this will result in a stronger and sharper blade. Be sure to examine the cutting teeth on the blade; if they are dull or chipped,the blade won’t be able to hold an edge and will require frequent sharpening.
For the handle, you can choose from a variety of different materials such as wood, antler, bone, or synthetic options like G10 or Carbon fiber. Whatever material you select should be durable enough to withstand both repeated use and any weather conditions it may face. Be sure to consider the size of your hands when selecting a handle size, as comfort and control are key considerations for any knife.
Blade design
Once you have the raw materials ready, it’s time to get creative. Start by clamping the sawzall blade in a vise or with some clamps and use a hacksaw blade to shape the metal into your desired shape. You can choose from a variety of edge designs such as drop point, clip point, spear point, tanto, or any other custom design you can think of. Drop point and clip point designs are great for carving as they offer a wide range of motion with minimal effort. On the other hand, spear point and tanto designs are better suited for heavier tasks [1].
Handle Construction
The construction of the handle is equally as important as the blade in DIY knife making. Once your blade is shaped and smoothed, it’s time to craft the handle. Start by cutting your selected material to the appropriate size. You can choose to either attach it directly to the blade, creating what is known as a ‘full tang’ knife, or create a pocket in the handle and insert the end of the blade into it, making a ‘hidden tang’ knife.
In full tang construction, the handle material is typically split into two pieces, known as scales, which are then attached to either side of the blade using pins or bolts. This creates a durable and balanced knife and is the most common construction method.

In hidden tang construction, a slot is carved into the handle material where the blade’s tang is inserted. This method allows for a wider range of handle shapes and sizes and can create a more traditional look.
When attaching the handle, ensure a snug fit to the blade for safety and control. Once the handle is fastened, it can be shaped and sanded down to fit comfortably in your hand. After the handle is to your liking, you can finish it with oil or a sealant to enhance its durability and appearance.
Remember to take your time with this step, as the handle is where you will interact with the knife most. A well-constructed handle not only increases the functionality of the knife but also adds to its aesthetic appeal.
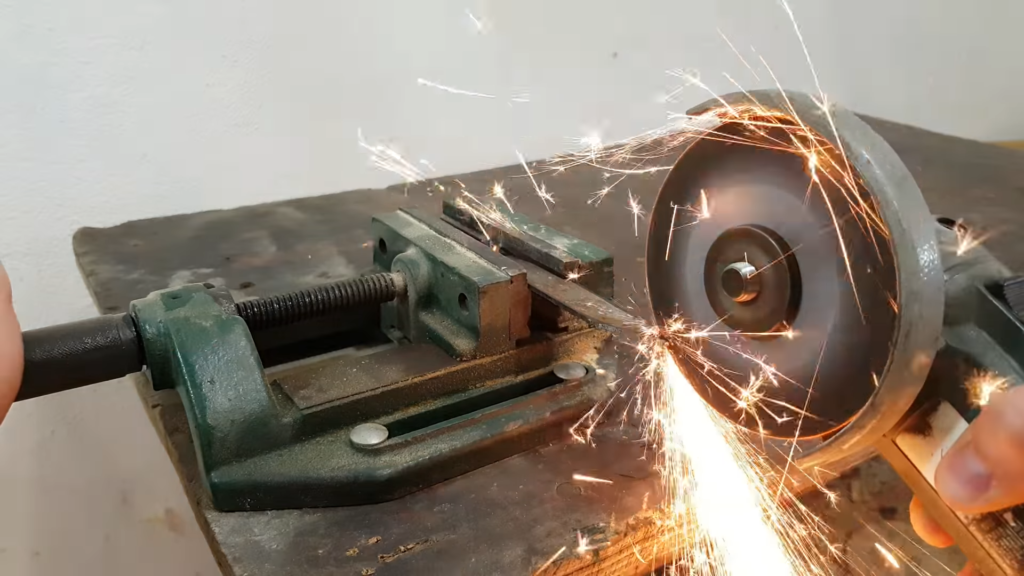
Cutting out the blade
Now that you have the handle complete, it’s time to move on to the blade. First, clamp the sawzall blade in a vise and use a hacksaw to cut off any excess metal. Then use a file or sander to refine the edges of the knife for enhanced functionality and safety.
If desired, you can also drill into the blade to create decorative perforations or even attach different materials such as brass, copper, or wood. This can be a great way to add unique elements and make your knife stand out from the crowd.
Setup for filing the bevel
Now that you have the blade and handle complete, it’s time to move on to the final step-filing the blade bevel. A bevel is a curved edge at the base of the knife which allows for a smoother cut and improved control. To create this bevel, begin by attaching some sandpaper or emery cloth to a flat surface such as a table or countertop. Then, position the blade at an angle and press it against the sandpaper in a circular motion. Repeat this process until you reach your desired bevel size, being sure to check your progress frequently with a ruler.
Finishing Touches
Once you are satisfied with the shape of your blade and handle, it’s time for the finishing touches. Start by applying oil or a sealant to both the blade and handle for added protection. This will help to prevent moisture from corroding the metal and ensure that your knife stays sharp for years to come.
Finally, inspect the entire knife before use. Test the blade’s edge for sharpness and check all of the connections between the blade and handle for tightness. Once everything looks good, your knife is ready for use!
Making a custom knife at home can be an incredibly rewarding experience and with the right tools and materials, you can craft a quality blade that will last for years to come. With some practice and patience, you too can turn raw metal into something truly unique [2].

About steel and heat treating
Heat sources
When making a knife with traditional means, one of the main tools you need is some sort of heat source. One of the most popular heat sources for knife makers is a forge or kiln, which can be used to bring steel up to higher temperatures that would not be possible by open flame alone. This allows for more precise control over how much heat is applied and makes it easier to get the steel up to a consistent temperature.
When it comes to heat sources for heat treatment, there are several options to consider. One popular choice is electric furnaces, which offer precise temperature control and are known for their efficiency. Another option is gas forges, which provide high heat output and are commonly used in blacksmithing. Additionally, charcoal forges are valued for their traditional appeal and ability to produce intense heat.
When selecting the most suitable method for heat treatment, it is important to carefully evaluate the unique advantages and disadvantages of each heat source. Factors such as temperature control, heat output, and personal preference play a crucial role in making an informed decision that meets your specific needs and requirements. By considering these factors in detail, you can ensure optimal heat treatment and achieve the desired results.
Heat treating a blade
Once you have selected the most suitable heat source, it is time to begin the process of heat-treating your blade. The first step in this process is to bring the steel up to a high temperature, which varies depending on the type of steel used and the desired results. It is important to make sure that during this step, the entire surface area of the steel has been heated uniformly.
Once the steel has reached the desired temperature, it is then cooled rapidly to harden and increase its toughness. Depending on the specific type of steel used, this can be done by quenching the blade in oil or water. It is important to make sure that during this step, cooling is as even as possible throughout the entire blade.
Once the blade has been quenched, it is then tempered to reduce brittleness. This can be done by heating the steel to a lower temperature than it was during the hardening process and then quickly cooling it again in oil or water. During this step, it is important to maintain proper control over the heat sources and carefully monitor the temperature so that optimal results are achieved.
Differential Tempering
Differential tempering is a process used to achieve different levels of hardness on the various parts of your blade. This can be done by treating different portions of the blade differently, with those parts that require higher toughness and flexibility being tempered at lower temperatures and those requiring greater durability and hardness being tempered at higher temperatures. By doing so, you can create a stronger, better-balanced blade.
Differential tempering requires careful control over the heat sources and precise monitoring of the temperature to achieve optimal results. It is important to be aware that this process should only be attempted by experienced knife makers, as it can lead to unpredictable results if done incorrectly. With proper care and attention, however, you can create a truly unique and durable blade.
Caring for Your Knife
Once you have completed the process of heat treating your blade, it is important to take proper care and maintenance of your knife. Proper cleaning and storage can help ensure that your blade remains in optimal condition for years to come.
Start by giving the blade a thorough cleaning, and paying special attention to any nooks or crannies. Once clean, it is important to oil your blade with a rust-inhibiting lubricant to protect against moisture and corrosion.
When not in use, it is best to store your knife in a dry place that is out of direct sunlight. Additionally, it is helpful to wrap the blade in cloth or other material before storing it to help absorb any excess moisture.

By following these simple steps, you can ensure that your knife remains in optimal condition for many years to come and will perform at its best [3].
FAQ
Can you make knives from saw blades?
Yes, you can make knives from saw blades. It is a relatively simple process and can be done with minimal tools. First, you need to choose the type of saw blade that best suits your needs. Then, measure the blade to ensure that it is the right size for your project. Next, use a grinder or file to shape the cutting edge of your knife.
Once your knife is shaped to your satisfaction, you can add a handle. Handles usually come in two varieties – full tang and rat tail. Full tang handles are much stronger but require more work as they must be fitted into the blade before it can be riveted together. Rat tails are easier to install and provide a secure grip, but may not hold up to heavy use. Finally, you can sharpen your knife to make it ready for use.
This process may seem daunting at first, but with patience and practice, you can create beautiful knives from saw blades that will last a lifetime. With the right tools and materials, anyone can be a successful knife maker!
What are some common mistakes when making knives?
One of the most common mistakes when making knives is failing to properly heat treat the blade. Heat treating a blade helps make it strong, durable, and able to retain an edge for longer. If you do not heat treat your knife correctly, it will be much more susceptible to damage and wear.
Another mistake that people often make is not taking enough time to properly finish their knife. This includes deburring sharp edges, polishing the handle, and properly filing and shaping the blade. Taking your time to make sure that all of these details are done correctly will ensure that you have a high-quality knife in the end.
Finally, it is important to remember to stay safe when making knives. Always wear protective gear and take precautions to prevent cuts and accidents. With the right tools, knowledge, and safety protocols, you can make knives that will last a lifetime.
Can you cut hardened steel with a Sawzall?
No, a Sawzall cannot cut through hardened steel. This type of saw is designed to cut through softer materials like wood and plastic. To cut through hardened steel, you will need a cutting torch or grinder. It is important to take the necessary safety precautions when using these tools, as they can be dangerous and cause serious injuries if not used properly.
What is the best way to sharpen a knife?
The best way to sharpen a knife depends on the type of blade and its intended use. Generally, most kitchen knives can be sharpened using a honing steel or a whetstone. Honing steels are great for keeping edges straight and true, while whetstones allow you to fine-tune the angle of your blade.
For pocket knives and outdoor blades, you may need a more aggressive approach such as using a diamond stone or belt sander/grinder. These tools will allow you to quickly sharpen a dull edge and get back to work. It is important to remember that sharpening can be dangerous, so make sure to wear protective gear and follow all safety instructions.
Useful Video: Making a Wood Carving Knife from an Old Saw Blade
Conclusion Paragraph
So, it is really possible to make a carving knife from a sawzall blade with the right tools. You just need to have a good sawzall blade, some sandpaper or a grinding wheel, and a handle material of your choice. With these things, you can make a nice knife for yourself that can be used for years if maintained properly. Making knives is an interesting hobby that requires patience and skill. It’s also a great way to express your creativity and make something that can be used for practical purposes. Above all else, ensure you use the proper safety techniques when making a knife or any other type of tool. Be safe, have fun, and happy crafting!
References
- https://www.primitiveways.com/pt-knives-1.html
- https://www.instructables.com/DIY-Carving-Knifes-From-Hacksaw-Blades-Custom-Box/
- https://www.koiknives.com/blogs/news_updates/7-tips-for-knife-care-and-maintaining-your-knife-in-2022