

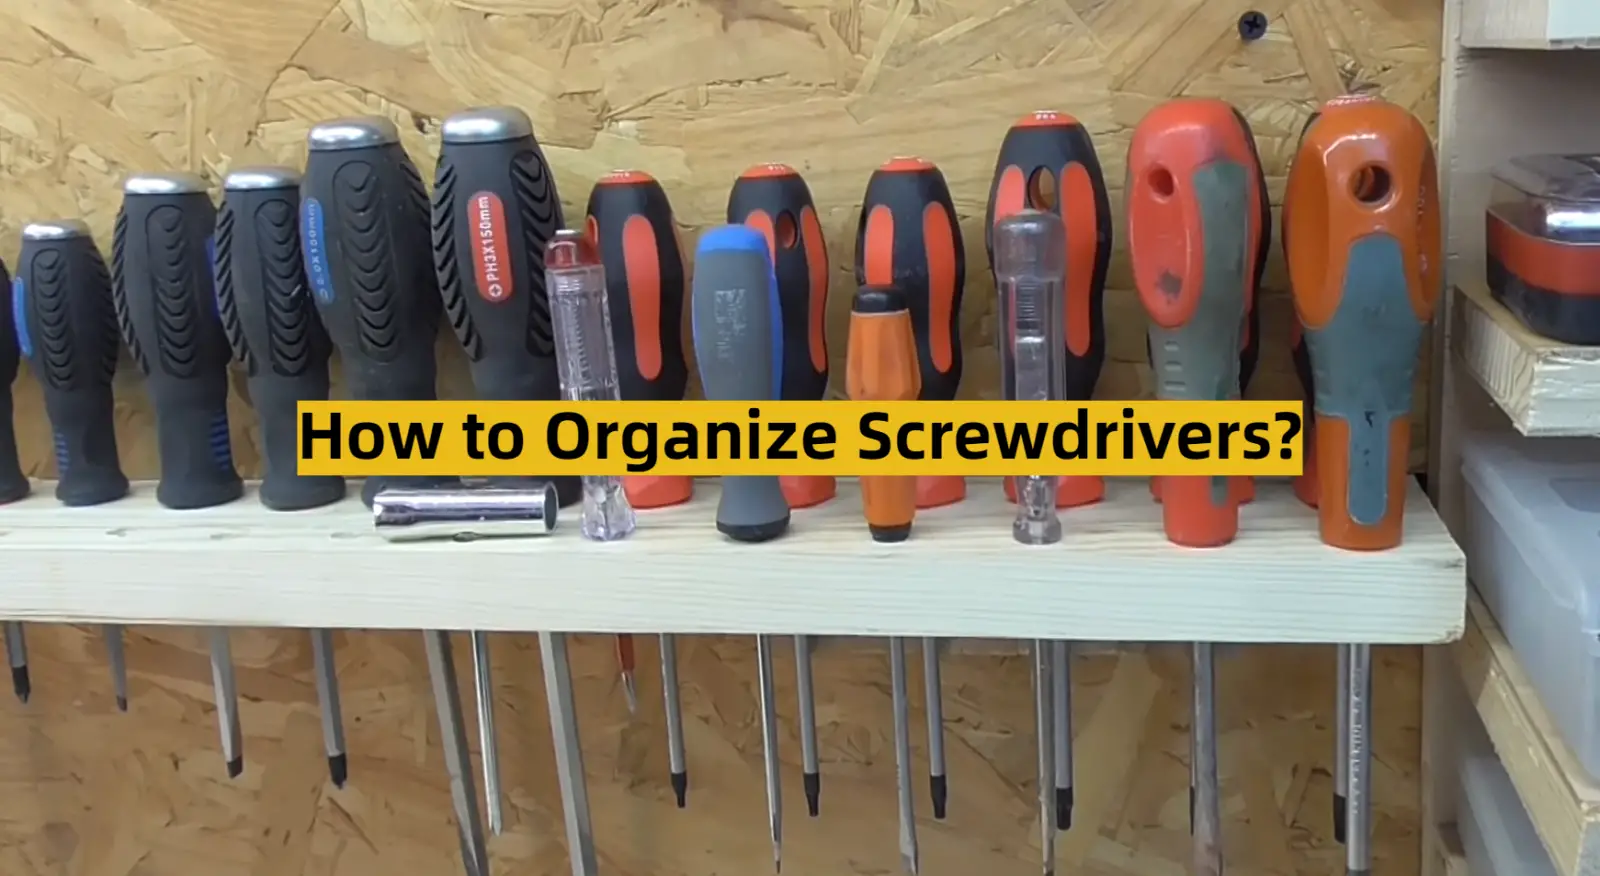
Organizing your screwdrivers is an essential part of any tool collection. It’s important to keep track of which screwdriver head type or size you have on hand, so you can quickly access the right one when needed. This article will provide answers to frequently asked questions about how to organize screwdrivers and offer useful tips for keeping them in order. With the right system in place, you’ll be able to quickly find the screwdriver you need for any task.
How do you store a screwdriver in a tool chest?
When placing the screwdrivers in the drawer, keep them lined up in a row and use dividers or separators to hold them in place. This will help keep all of your screwdrivers organized and easy to find. [1]
How do you make a screwdriver shelf?
Making a screwdriver shelf is an easy way to store your screwdrivers in an organized manner. You can make a simple shelf with just three materials: plywood, dowels and screws.
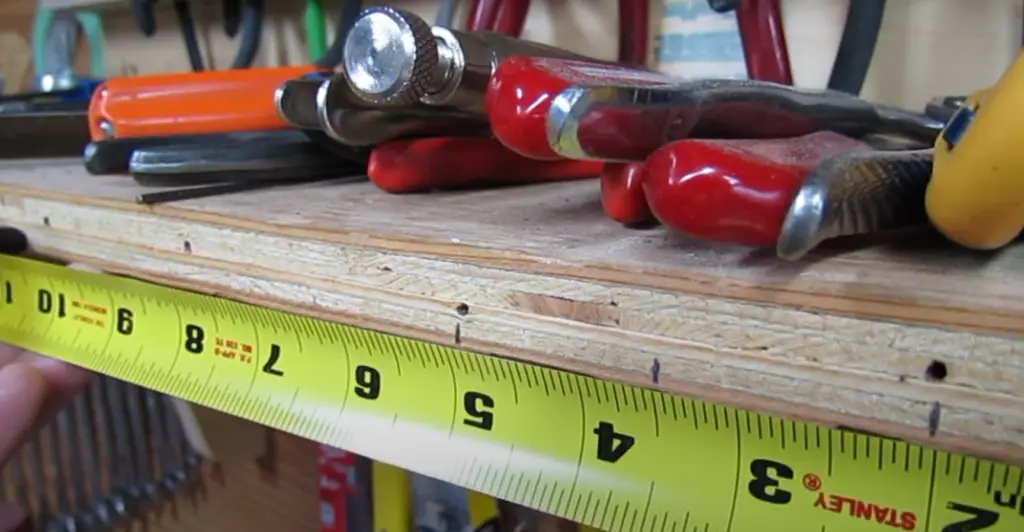
First, measure the size of the space you want for your shelf and cut plywood into two equal-sized pieces for each side. You can use a circular saw, jigsaw or hand saw for this. Next, cut four pieces of dowel that are the same length as the plywood and glue them to the sides of each piece. Use wood glue or epoxy for this step.
Once your shelf is assembled, attach it to a wall using screws. You can mount it to studs in the wall or use drywall anchors if you don’t have any studs available.
Next, add dividers to create compartments for your screwdrivers. Measure the width of each compartment and cut wood strips that size. Then, attach them between the dowels on each side using screws or glue.
Finally, add labels to each compartment so you can easily identify where each screwdriver belongs. You can use stickers or even a marker and paper cutouts for this step. [1]
How do you store tools without a garage?
If you live in a space without a garage, storing tools can be tricky. Fortunately, with the right organization and storage solutions, it’s still possible to keep your screwdrivers neat and orderly! Here are some tips on how to organize screwdrivers without taking up too much space:
- Utilize wall space. Wall-mounted pegboards are an excellent option for storing screwdrivers in a small area; they help you to keep your tools organized and off the floor, so you won’t have to worry about tripping over them! Additionally, bins and shelves can be attached to walls or hung from pegboard for added storage capabilities.
- Buy a toolbox. If you have limited floor space, buying a toolbox is a great alternative to having pegboards or shelves on the walls. A small toolbox can fit neatly into corners and be tucked away when not in use; plus, it’s easy to carry around if you need to transport your tools somewhere.
- Create a tool rack. Creating your own tool rack is also a great way to keep your screwdrivers organized without taking up too much space. To make one, get some lumber and cut it into the desired lengths; then, attach nails or hooks for hanging your screwdrivers. [1]
What to use when you don’t have a screwdriver?
There are many other tools that can be used when you don’t have a dedicated screwdriver. A flat-head or Phillips-head screwdriver is the most common kind of screwdriver, but if you don’t have one at hand then you may need to get creative!
One option could be to use a knife. A kitchen knife can work in a pinch, but you should be very careful and take extra precautions when using it as a screwdriver. Use the pointed tip of the blade to fit into the head of the screw and apply pressure while turning it counterclockwise. Be sure to use your other hand to steady and support whatever surface you’re working on.
You can also use a nail or other pointed tool in place of a screwdriver. Just make sure that the size and shape match correctly with the head of the screw so that it fits securely and you don’t damage anything. [1]
How do I make a homemade screwdriver?
Making a homemade screwdriver is easy and inexpensive. With just a few basic supplies, you can make your own tool that will help you with all kinds of projects.
To start, find a piece of wood that is about 6-8 inches long and 1 inch thick. You’ll also need some screws (preferably Phillips head), a drill, and some sandpaper.
Begin by drilling two holes in the piece of wood with your drill – one at each end. These will be the handles for your screwdriver. Then, thread your screws into the holes you just drilled. Make sure that they fit snugly so that they don’t spin around when you use the tool.
Finally, sand down the edges of your screwdriver to make sure it’s comfortable to hold in your hand. You can also use a knife or file to further refine the shape of your homemade screwdriver. [1]
What is the best way to store screwdrivers?
If you’re looking for the best way to store screwdrivers, you should consider a few things. First of all, it’s important to think about how much space you have available and the type of screwdriver set that you own. For instance, if you have a large set with several different sizes and types of drivers, then a sturdy toolbox or drawer organizer might be the way to go. On the other hand, if you have a more limited set of tools, then something like a pegboard or magnetic strip might be the best choice for keeping your screwdrivers neatly organized and easily accessible. [1]
How do I keep tools from moving in my toolbox?
You can also use dividers to separate the various types of screwdrivers, pliers, wrenches, etc. so that you can easily find the one you need in a hurry. You can also use wall organizers or pegboard to hang up your screwdrivers and other tools for easy access.

If you don’t have any of these materials, then some simple organization will go a long way. To start, separate your screwdrivers into categories, such as flathead screwdrivers or Phillips head screwdrivers. You can then further divide these into small and large, color-coded by size if you like. This will make it easier for you to quickly identify the right tool for the job. [1]
How do you store tool boxes?
Tool boxes are great for keeping your screwdrivers organized and secure. You can find tool boxes in different sizes, styles, and configurations, depending on the number of tools you need to store.
Some have movable sections or drawers where you can keep small parts like screws separated from larger items such as wrenches or pliers. Others feature a large, open space for larger tools and a smaller compartment or shelf on top to store other items.
When choosing a tool box for your screwdrivers, be sure to measure the size of the box so it will fit in your storage area comfortably with enough room for all your tools. Look for boxes that are made from a durable material such as steel or plastic, and be sure to check that the latches on the box are secure.
To make it easier to locate the tools you need quickly, you may want to label your tools with a marker or invest in removable labels that you can stick onto your toolbox. [1]
How do you make a screwdriver holder out of wood?
If you’re looking for a DIY project to store your screwdrivers in an organized way, making a wooden holder is a great option. Here are the steps you can take to create a wooden holder for your screwdrivers:
- Gather your materials. You’ll need wood (plywood or MDF), sandpaper, saw, drill, screws and nails, clamps, wood glue, wood stain or paint.
- Measure out the pieces for your holder. For an easy-to-assemble design you can use eight pieces of 9″x14″ MDF (or other material) cut into two 15″ long pieces and six 11″ wide pieces.
- Cut the pieces according to your measurements using a saw, then sand down any rough edges with sandpaper.
- Clamp the two 15″ long pieces of wood together and drill four pilot holes along their length, spaced evenly apart. Do this for all eight pieces of wood – seven of which will be used as shelves, and one for the back of your holder.
- Using a drill, attach the six 11″ wide pieces to each other and to the two 15″ long pieces with screws or nails. This will form the frame of your holder. [1]
What is the ideal place for storing tools?
The ideal place for storing tools like screwdrivers is a cool, dry room that has plenty of room and storage space. It should be away from sources of heat, such as radiators, and away from areas that are prone to dampness or flooding. If you have a shed at the back of your yard, or an outbuilding that can be used for storage, this is a great place to keep your screwdrivers and other tools. You should also make sure that the area is well-ventilated to avoid problems with rust or corrosion.
Once you have located an ideal storage spot, it’s important to find a way of organizing your screwdrivers so they are easy to access when you need them. Make sure that all your screwdrivers are kept in one place, either in a toolbox or on a pegboard. If you have a wide variety of different sized and shaped screwdrivers, it’s important to keep them separated so that they don’t get jumbled up with each other. [1]
How do you store tools in a tiny apartment?
When you live in a small apartment, finding space to store your tools can be quite difficult. But it’s not impossible! There are still ways to make the most of what little storage space you have.
First, try hanging your screwdrivers on the wall or storing them in pegboards. This is an easy way to declutter and keep your tools off the floor or counter. You can also use a toolbox or tackle box to store your screwdrivers. These are great for organizing small items like screws and nails, as well as larger tools such as hammers and pliers. [1]
How do I make tool storage?
If you’re looking to get your tool storage organized, there are several ways to go about it. The most common way is to use a pegboard with hooks and baskets for organizing the smaller tools. This allows you to easily hang items such as screwdrivers and other small tools in one place, making them easier to access whenever needed. For larger tools such as a drill or saw, you may consider getting wall-mounted shelving or a rolling tool cart. With these options, you can keep your tools organized and neatly stored in one place.
Another way to organize screwdrivers is to use magnetic strips. These are typically long strips of metal that have small magnets attached to them. You can hang the strip onto a wall and use it to store your screwdrivers (or other small tools) in an orderly fashion. The magnetic strips make it easy to grab the tool you need quickly, allowing you to save time when tackling projects around the house or at work. [1]
Is it OK to leave garden tools outside?
When it comes to garden tools, it’s best to consider the specific type of tool and its purpose before deciding what’s best for storage. If you are using hand tools like a shovel or rake that won’t be impacted by rain or snow, they can easily be stored outside without worrying about damage. However, if the tool is more intricate like a pair of pruning shears, you should store them inside. This will help protect it from rusting or breaking due to exposure to the elements.
When storing screwdrivers outside, it’s important to consider their make and material. If they are made of stainless steel or chrome-plated steel, leaving them outside shouldn’t be a problem. But if the screwdrivers are made of other metals, it’s best to store them indoors to prevent rusting and breakage. It’s also important to remember that outdoor storage should be kept away from direct sunlight as this can cause plastic parts to become brittle or warped. [1]
How to Make a Wall-Mounted Screwdriver Rack
Materials Needed
- Wood screws
- L-brackets
- Hammer or drill and screws
- A saw
- Sandpaper
- Screwdriver rack or shelf brackets [2]
Preparing the Rack
Begin by measuring the wall space you have available for your screwdriver rack. Cut a piece of wood to size and sand it down if needed.
Next, attach two L-brackets at either end of the board using screws and a drill or hammer. [2]
Dipping the Screwdrivers
Once the brackets are attached, it’s time to dip your screwdrivers. Place your screwdrivers in a bucket and fill it with soapy water. Let the tools sit in the water for 10 minutes before taking them out and rinsing them off with clear water. This will help remove dirt and debris that may have accumulated over time.
Once the screwdrivers are clean and dry, they’re ready to be mounted on the rack. [2]
Hanging the Rack
Hang the rack on your wall using screws and a drill. Make sure that the screws are long enough to go through both the board and into the wall studs for maximum support.
Once your screwdriver rack is secure, it’s time to start adding your tools! Place each screwdriver into its designated spot, and you’re ready to get organized. [2]
Finish
Your wall-mounted screwdriver rack is now ready to use! Keep it organized by returning your tools to their designated spot after each use. This will help you save time and ensure that you always know where your tools are located.
Creating a wall-mounted screwdriver rack is an easy way to get organized. [2]
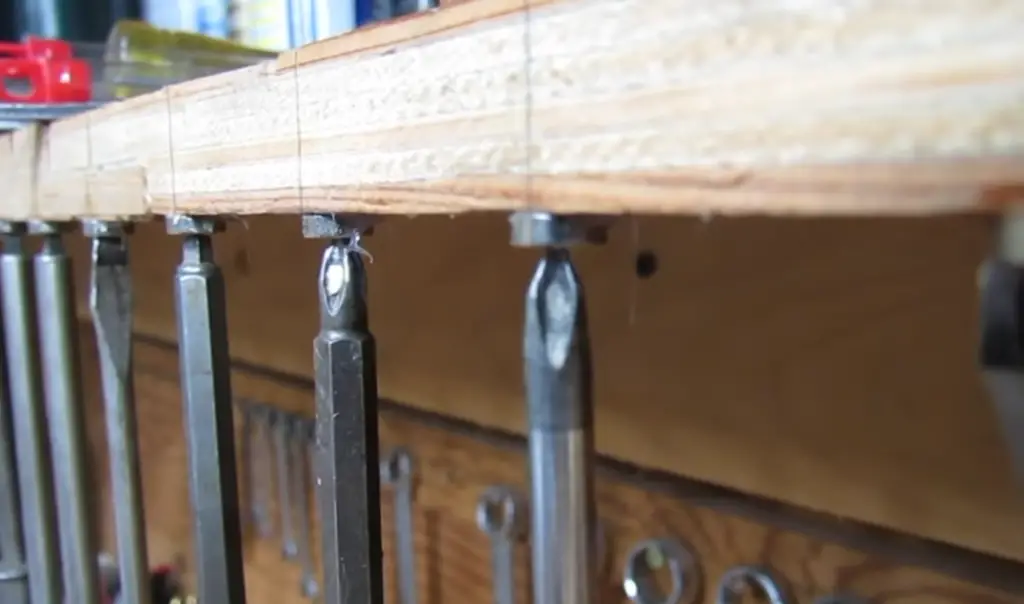
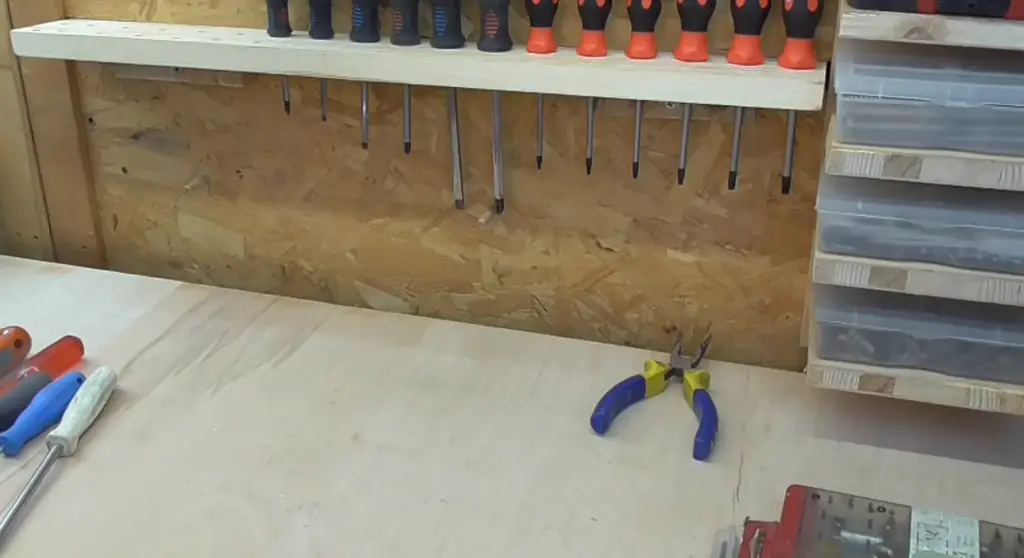
Easy and handy DIY wood screwdriver organizer
This simple but effective project requires no fancy woodworking skills and takes less than an hour to make. Here’s what you’ll need:
- A piece of plywood, about 1/2-inch thick, in the size you need for your project
- Some 1×2-inch boards for the sides
- Wood glue or screws (optional)
- Sandpaper
- A drill and bit
- Paint, stain or varnish (optional)
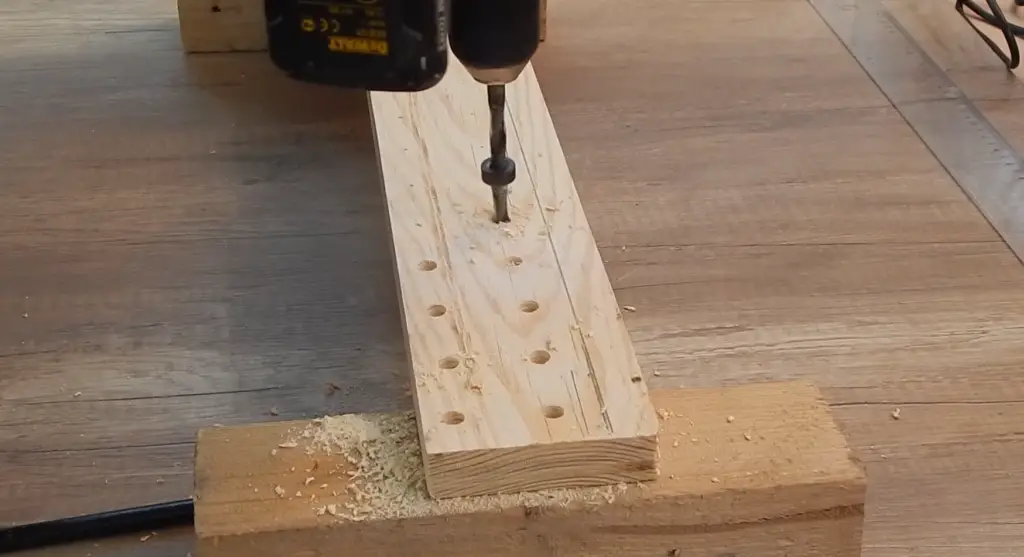
To start, measure the size of your plywood and cut it to fit. The easiest way to do this is with a table saw, but you can also use a hand saw if you don’t have access to one. Once the plywood is cut, sand it down to ensure a smooth finish.
Next, measure and cut five 1×2-inch boards for the sides of your organizer. These should be about 4 inches high, or tall enough to fit your screwdrivers in. Glue them together using wood glue (or screws if you’d prefer) and let it dry.
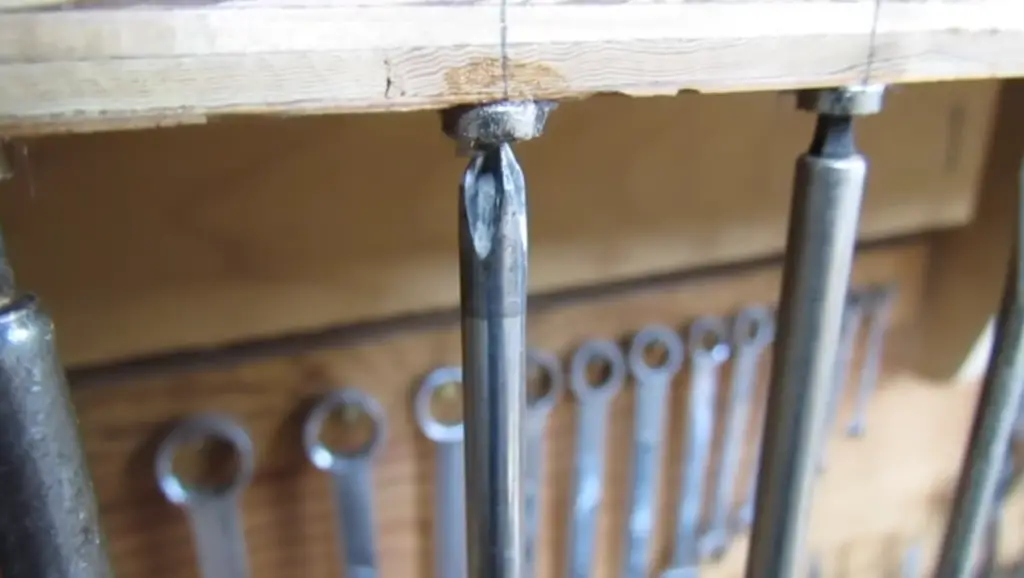
Now, mark out the holes in the plywood where you’ll be drilling for your screwdrivers. You can do this with a pencil or marker, or use a drill bit guide if you have one. Using the appropriate drill bit size for your screws, drill out each of these holes. [1]
FAQ
What is the best way to sort tools?
The best way to sort tools is by size and type. Grouping like with like makes them easier to find when needed. It also helps you stay organized and keep track of all your screwdrivers in one spot. You can organize them by shape, color, or even material type. Additionally, organizing your tools on a pegboard or wall-mounted rack is an excellent way to store them. It allows you to see each screwdriver at a glance and makes it easier to grab the right one for the job.
How do you organize a toolbox?
Organizing a toolbox can be done in several ways. Firstly, separate your tools by function and size. For instance, group together all the screwdrivers and place them in their own compartment or drawer. Additionally, you may want to use labeled dividers to make it easy to find what you’re looking for quickly. Lastly, purchase compartments and bins to hold smaller items such as nails, screws, drill bits, and other parts. This will keep them from getting lost in the bottom of your toolbox.
How do you organize all the tools?
Organizing all your tools starts by assessing your collection. Determine which ones you use on a regular basis and designate a spot for them in an accessible area. Then, separate the larger items into categories by size and type – such as wrenches, hammers, and screwdrivers – before storing them in drawers or on hooks. Finally, use labeled compartments and bins to store all the smaller items, such as nails, screws, drill bits, and other parts. This will ensure that everything is easy to find when you need it.
How do you organize screws and nails?
Organizing screws and nails is easy if you have the right storage containers. Purchase small plastic boxes or bins with compartments to store them in. Label each box for easy identification, such as “1/2-inch drywall screws” or “3-inch deck screws.” Then, separate your nails by size, material, and point type into labeled containers as well. Lastly, to keep them from spilling out of the containers, use plastic bags with zip-top closure. This will help you stay organized and make it easier to find the right screws and nails when you need them.
How do you categorize screws?
Categorizing screws is important when organizing them for easy retrieval. To do this, separate them by type – such as wood screws, drywall screws, and lag bolts – then by size, material, and length. If you’re dealing with a large number of screws, label each container to make it easier to find the ones you need. Lastly, store them in an organized manner such as in drawers or on hooks so that they can be easily accessed when needed.
How should screws be stored?
Screws should be stored in a dry, cool place away from humidity and direct sunlight. Additionally, storing them in plastic containers or labeled bags will keep them from getting lost or misplaced. To make finding the right one easier, group your screws by type, size, material, and length before placing them in separate containers. Lastly, if you’re dealing with a large number of screws it may be helpful to store them in drawers or on a pegboard for easy access.
How do you organize drill bits and screws?
Organizing drill bits and screws can be done by grouping them together. Purchase labeled containers for each type of drill bit, such as spade bits or screw-driving sets, and place them in separate drawers or bins. Similarly, purchase labeled boxes or bags to store screws and nails in according to size, material, and length. If you’re dealing with a large number of drill bits and screws, using a wall-mounted rack or pegboard is an excellent way to store them. This will make it easier to grab the right one for the job quickly.
Useful Video: DIY – How to Build Wall Screwdriver Holder From Pallet Wood – Bob The Tool Man
Conclusion
Organizing your screwdrivers is a simple way to keep them safe and in easy reach when you need them. As long as you know where each one goes, it shouldn’t be too difficult. Choose the right kind of storage, categorize them properly, and add labels so that you can easily find the right tool for the job. With proper organization, your screwdrivers will always be ready to help you out with any project.
If you want to make sure that your screwdriver collection is well-organized, use the tips outlined in this article and start organizing them today! Your efforts will definitely pay off in the long run. Keep all of your tools organized and accessible so that you can always get the job done quickly and without any hassles. Good luck!
References
- https://www.hgtv.com/design/make-and-celebrate/handmade/how-to-make-a-wall-mounted-screwdriver-rack
- https://www.funkyjunkinteriors.net/diy-wood-screwdriver-organizer/